Showing posts with label cut sew press love. Show all posts

Thursday, May 30, 2013

PTS 10


I have been wanting to participate in the Pillow Talk Swap on Flickr for a while now.  I've seen so many beautiful pillows made for each round, I had to get in on the action.  My chance finally arrived when I saw that sign ups were open for round 10.  Imagine my excitement when I saw that my partner was one of my favorite bloggers.  I already knew that she was a huge Anna Maria Horner fan, and in her mosaic I saw triangles, so that's the direction I decided to go in.  There is something about sewing triangles that I just love. 
I only had a few AMH prints in my stash so I ordered a charm pack of Field Study and Lou Lou Thi to work with.  I love the fact that AMH's charms are 6 inches instead of the usual 5.  I cut 60 triangles but ended up using only 25 of them.  Then I began playing with the layout.
 
 
This was ok, but ok wasn't gonna cut it.  It needed something more.
Enter some texty lovliness.  It was so fun showing teasers to the group throughout the process and getting such positive feedback.
 
Once the piecing was done I had to figure out how to quilt it.  I love free motion quilting but I wanted to push myself outside of my comfort zone so I decided I would attempt hand quilting for the first time.  I used six different colors of Perle cotton 8wt.  I also did not use any kind of quilting hoop or frame.
I must admit, I did pick out my stitches more than once due to uneven stitches.  Once I got in the groove though it went nice and smooth.  I did a simple petal motif in the center.
For the low volume background it took me forever to decide what to do with that area.  Finally I settled on simple straight line quilting that echoed the hexagon.  I did the colors by hand and then machine stitched the white with the perle thread.  I never knew you could do that but thanks to Little Miss Shabby, I discovered a new technique I will definitely be using again.

I really enjoyed making this pillow especially knowing who I was making it for.  I think it was pretty obvious that it was for her.  I wanted it to be special and I hope I achieved that.  Judging from her comments on Flickr I think she's going to be a happy lady.  I also made her a linen feather pouch and a wall hoop pocket but I forgot to take a pic of the hoop. :(

I cannot wait to see which pillow I receive!  There are so many beauties in the group I know I will love any one I get.

Thanks for reading!

Melissa
 
 
Follow on Bloglovin

Tuesday, April 23, 2013

Circle Celebration Pillow

This little pillow was made for my second time participating in the X-Factor Pillow swap.  The theme was circles.  I wanted to do something different but wasn't sure in what direction I wanted to go until I saw this photo full of amazing paper pieced blocks made by Wombat Quilts.  Those blocks are seriously stunning!  Something about the Celebration block stood out to me and so I decided to go with that one.  I've foundation pieced before and I enjoy the process but man oh man did this block kick my butt!  I screwed it up so many times.  This was almost the pillow that didn't happen.
Here is the 1st block I made.
I was so excited because I used a color wheel to choose my colors.  I wanted to get away from my rainbow comfort zone.  When I was done I just didn't love it so I decided to go back to a rainbow design. 
A word of advice, although it may be relaxing, don't drink and paper piece.  I had to unpick seams more than a few times.  Even when I hadn't been drinking I still messed up despite being super careful.  Can you spot the mistake?
 
Frustrating for sure.  I almost gave up at the thought of having to cut more fabric to redo the segments, and although my instagram friends said it wasn't that noticeable I couldn't send it out in the world knowing it was off.  So I cut the pieces again.  For the quilting I decided to go with straight lines to highlight the design of the block.
And then came the binding issue.  I love piping on a pillow and so I tried it on this one, with this result.
Terrible, hated it, bring on the seam ripper once again!  In the end it was better without anything.

For the back I used Roses in Celebration from the Valentina collection.  I also used Svetlana's awesome tutorial for a hidden zipper closure.
For all it's trouble, in the end I'm glad I stuck it out and finished this little pillow. 
It finishes at 15 inches square.  I used Kona Ash for the background.  The free block pattern can be found at Quilting On the Square along with lots more blocks.


Thanks for reading!

Melissa

Monday, November 26, 2012

Christmas Sewing


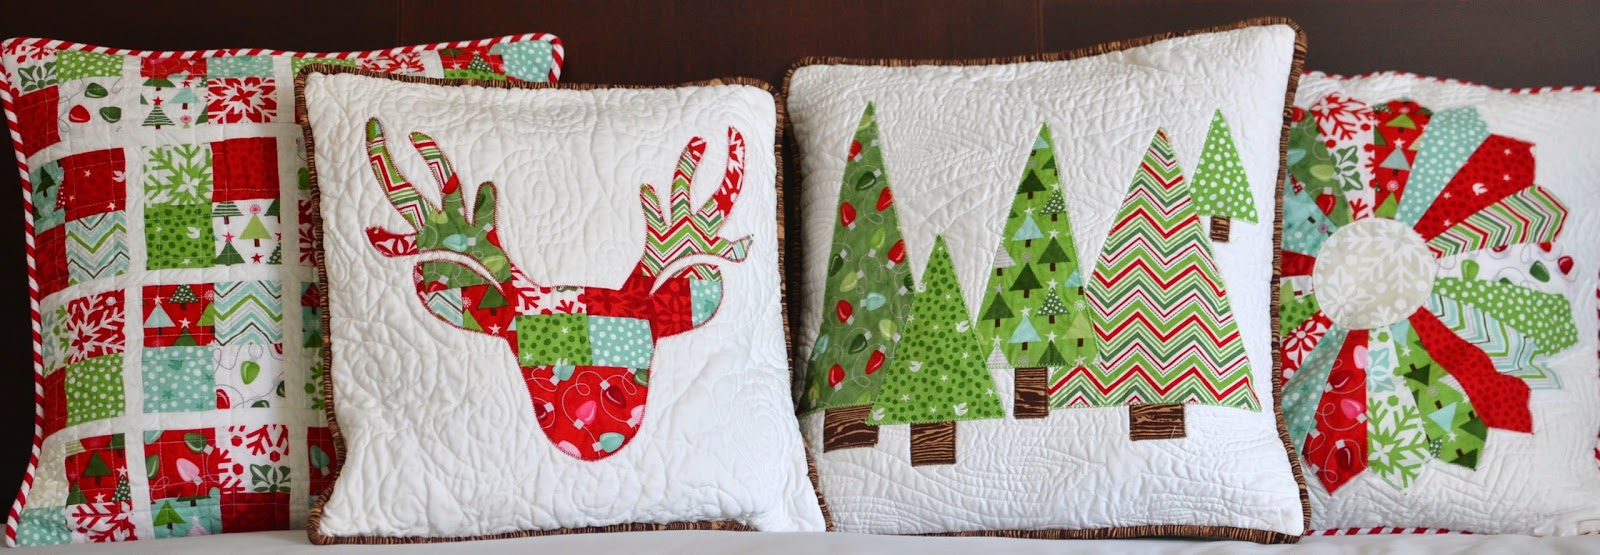
The pillow covers for my mother in law are done!  I really love them.  My goal was to make them modern but still have a  warm homey vibe to them.  I found a bunch of inspiration on flickr and went from there.
I pushed my quilting by attempting patterns in the book "Free Motion Quilting with Angela Walters."  This book is so beautiful to look at and definitely inspiring.  I was really proud of my wood grain quilting.  It was fun to try and gave a lovely result.  The attempt at concentric circles didn't leave me too happy at first, but after the cases were washed it looks a whole lot better.
Less than half a layer cake was used to make these.  I bought it from Pink Castle Fabrics via an instagram sale. I have enough left to make some more Christmas gifts.

DSC_1082
 
Dresden blades
DSC_0899
DSC_1075
DSC_1086

First time trying this wood grain technique.  I started with some marking lines to get the hang of it.  I also went in an up and down motion instead of side by side.  It felt easier to me that way.
DSC_0939
DSC_1074
DSC_1077

A reindeer in the making.  (November 2013 Here is an update on how I did it.) 
When I made it last year I was looking for the perfect deer head silhouette.
This is the link to the one I used
http://www.itsoverflowing.com/2012/10/no-sew-pillow-antler/

What I did was trace the shape on my computer screen,  outlined it in a black sharpie, and then enlarged it by copying and printing it at a larger size. Hope that helps :)
DSC_1067

It was not intentional to have him look like he had shades on but I think it makes him cooler.
DSC_1079
DSC_1087
DSC_1090

Fabrics Used:
layer cake of Joy by Kate Spain for Moda
Aviary Woodgrain by Joel Dewberry
Kona Snow
Michael Miller Clown Stripe in Red
Backing - Christmas collection fron Joanne's

Monday, August 27, 2012

Pin Cushion Caddy

The weekend started off rainy here, which was perfect for staying home all day in pajamas and sewing.  I was able to make myself a cute pincushion caddy!

Pincushion Caddy
 
The pattern is from Anna Maria Horner's book, Seams To Me:  24 New Reasons To Love Sewing.  It's one of her older books so I found it pretty cheap on ebay with free shipping.  After reading a few reviews on the pattern I was a bit worried about it beeing too complicated.  I could not have done it without the help of Melanie's tutorial at Texas Freckles.  All of the pictures and instructions were so helpful.  The pattern pieces were cut Friday night and by Saturday evening I had myself a caddy.
 
Pincushion Caddy

DSC_0687

I only needed to cut one piece from the pattern.  The rest of the way I followed Melanie's instructions to get a custom fit tube and bottom.
Pincushion Caddy

Instagram progress
Joining the ball & tube


upload

I wish I could see the bottom all of the time.  I should have made the inside bottom with this fabric.  Oh well, hindsight...
Pincushion Caddy
I way overstuffed it and forgot to use something to support the sides during stuffing.  I also got some puckers but don't mind too much.  Instead of polyfill maybe some rice or plastic beads would be a better filler to give it some weight.  Imperfections and all, I love it!  The project involved machine and hand sewing but nothing too bad.  It was a nice way to spend an afternoon.
Pincushion Caddy

Here is the progress on the robot quilt.  I am going to start sewing these together soon.
robot hexagon quilt


Tuesday, August 21, 2012

Robo baby quilt start

You made it!  Thank you for taking the time to update your subscriptions and follow me over here.

One of my best friends is having a baby boy soon.  She really like robots so I bought this fabric for her quilt.  A hexagon quilt is on my sewing wish list and this fabric seemed perfect for the job.  I made myself a template and began cutting.

fabric for a boy quilt
I kicked that orange and red stripe out and substituted a yellow polka dot.
cutting half hexagons

I also made myself a design wall for about 17 bucks. It's much better than using the floor. here is as far as I've gotten.

on the design wall

On trips to the park I have been working on these jewel stars. I really enjoy English paper piecing. It's calming, and not as hard as I thought. Nice busy work for the hands.

jewel star

jewel star

I've gone from a whipstitch to a ladder stitch.  It looks much cleaner.

Thank you so much for taking the time to stop by.

Washi Dress

Last week Rae of Made by Rae released the pattern to her much anticipated Washi Dress.  After talking myself out of it for a few hours, I finally gave in and bought the pattern.  I am so glad I did.  The dress was fun to make, and so easy I was surprised.  I kept waiting for the complicated part but I never got frustrated once.  It took me a couple of days to make because of the boys and household stuff, but I think it could be done in a day with a few dedicated hours.  I do suggest cutting out everything one night and then have another day to put it all together.

The fabric I used is Wrenly Wildfield in Gypsy by Valori Wells.  How can you not love rainbow dandelions.  It was supposed to be for my Tova but the Washi Dress pattern seemed to be perfect for this fabric.  I love it so much and can't wait to wear it out.

washi dress

As I stated on instagram, I am petite at 5'2, but with 36DD nursing boobs. I cut out a size medium, made a muslin, and felt that I didnt need to do a Full Bust Adjustment.

washi dress

  The shirring in the back allows the front to fit nice and snug but not too snug  No boob smushing. 

washi dress back shirring
I didn't see any weird gaping on the sides either.  The only change I made was on the skirt part where I cut some off of the width of the dress.

side adjustment

 Next time I will just grade the pattern from a size medium bust to a small skirt.  I had to cut the pockets and resew them but it worked out fine.  The pockets are pretty sweet by the way.

washi dress

I like the bias tape to finish the armholes.
attaching bias tape

Its pretty on the inside too.

washi dress inside view

washi dress inside view

washi dress

In a wrap, I think this is a great pattern. Easy to follow instructions, with a great end result.  It feels so good to have made a dress I absolutely love!