Wednesday, January 30, 2013

Pickledish Mini

I am so excited to finally share with you the mini I made for a swap with Jessie of Inside The Paper Box.  Advance warning:  there are A LOT of pics in this post. 
I've been wanting to participate in some swaps on Flickr, but they all require prior swap experience and I had none.  I posted a message on instagram and Jessie so kindly volunteered to do a private swap with me to help build up my swappy street cred.  We posted inspiration collages and went from there.  I was so happy to see that one of her picks was Aneela's Pickledish block.  I've had this block bookmarked for a long time but never a reason or the time to actually make it.  And so here was my chance!  Jessie's only direction was that she liked scrappy. 
 
I have a very modest stash so everything I pulled was a favorite.
fabric selection
DSC_1353
The first few arcs were a bit tricky but then I got the hang of it.
DSC_1351
I included all of my favorite text prints for the cornerstones.
DSC_1354
Planning the layout.
DSC_1355
Pinning is crucial with these, but sewing the curves was no problem at all.  I found it very relaxing.
pinning the curves
Before I started any quilting, I sketched the block out and planned how I wanted each space to look.  My quilting was definitely inspired by Angela Walters.  I turned to both of her books and her Craftsy class for guidance.  I had planned to include swirls and circles in the background, but my skills aren't up to par yet.  I kept with the pebbles which was fun and not too difficult for my first time trying them.
quilt doodle
The only lines I actually marked were for the center quilting.
marking my quilting lines
At first I was having major tension issues and getting these weird knotty spots on the back.  Then I posted a pic on instagram asking for tips.  Within minutes I had some great suggestions and after a quick cleaning, needle change, and putting my feed dogs UP, it was smooth sailing!  I love instagram!
tension issues
DSC_1411
Pickledish mini
DSC_1425
Machine stitched binding.
pebbles
A view of the back.
backside view
I really had a great time making this mini.  I hope it is enjoyed in its new home.  Thanks to Jessie for the opportunity.  And thank you for reading!  :^)
Melissa

Linking up to Finish It Up Friday over at Crazy Mom Quilts.

Sunday, January 27, 2013

Hospital Maternity Gown and a Pezzy baby quilt


Happy New Year everyone!  I hope your year has gotten off to a great start.  I have been a busy bee lately. Lots of sewing has been done in January.  First off, my best friend is expecting a baby boy soon.  As requested I made her a hospital gown so she would look fabulous in those first moment photos.  I used a free pattern found at Lazy Girl Designs here.  Its a great pattern, very easy to follow, and makes a great gift.  Some changes I made were rounding out the neckline and using snaps at the shoulders.
applying snaps
Hospital gown
happy friend

Of course I had to make her a baby quilt.  I found this awesome tutorial at the Moda Bakeshop by Alyssa of Pile O' Fabric.  I had seen the quilt a while ago and loved it, and so this was the perfect opportunity to make one myself. 
Appliques ready to be cut out
I usually like to finish a quilt with hand stitched binding but I did not have the time to do it on this one.  Kelly's video (of Kelby Sews) on using invisible thread to finish the binding was super helpful.  At first I had some issues getting the thread on the bobbin, but after that was done it was smooth sailing.  Normally, I don't like the way my machine sewn binding looks, but this technique is one I will use again in the future.

invisible thread binding
DSC_1323
pezzy baby quilt
The great thing about this quilt is the size, it will definitely be able to be used on a toddler bed instead of just as a baby quilt.  I'm so happy she liked my gifts.  I really enjoy making handmade gifts instead of just going to a store and buying something off a shelf.  She liked the quilt so much she requested a matching pillow which is in the works now. 
 
Thanks for reading!
 
Melissa


Monday, December 31, 2012

Pillowcases for Newtown

Via Facebook, I found out about the pillowcase drive The Quilter's Corner was having for the children of Sandy Hook Elementary School.  My very modest stash consists of mostly fat quarters and a few half yard cuts.  Peg from Sew Fresh Fabrics so generously sent me some yardage to make pillowcases for the Newtown survivors.  I had some half yards that surprisingly coordinated with what she sent and this is the result.  Like she said, it felt good to do something tangible to help.
DSC_1252
Wishing you all a very Happy New Year!

Melissa

Friday, December 28, 2012

Open Wide feather pouches

Hi!  A quick rundown of what I've been up to lately.

Some strip piecing

DSC_1093
Led to a lot of these, scaled down versions of Anna Maria Horners featherbed pattern
DSC_1095
Some patchwork
DSC_1097
Pretty pouches for Christmas gifts.
A few tweaks need to be made with feather placement, but I like it!
The other side
DSC_1239
DSC_1136
DSC_1142
DSC_1238
DSC_1240
I think I'm keeping the yellow one for myself :^)  I used Noodlehead Anna's Open Wide Pouch tutorial.  It was fun to make these and I hope the recipients liked their gifts.
Next year I will start my handmade Christmas sewing in July.  Maybe, just maybe, I will be done in time.

Monday, November 26, 2012

Christmas Sewing


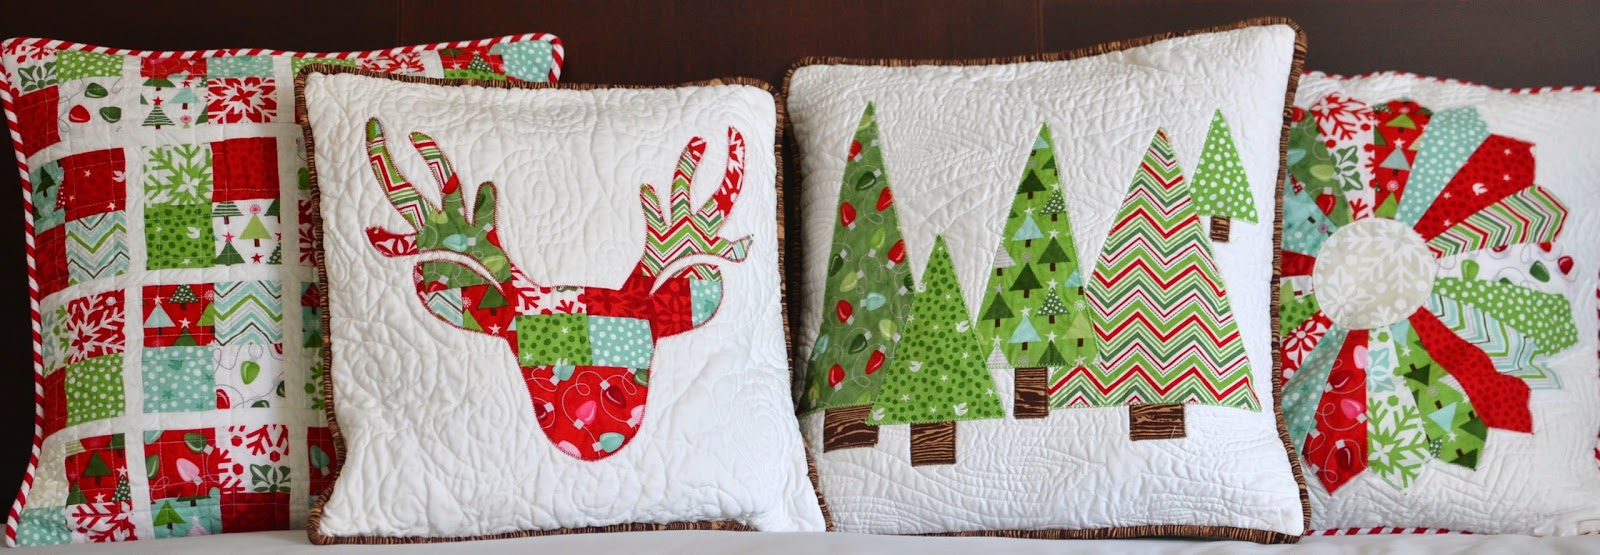
The pillow covers for my mother in law are done!  I really love them.  My goal was to make them modern but still have a  warm homey vibe to them.  I found a bunch of inspiration on flickr and went from there.
I pushed my quilting by attempting patterns in the book "Free Motion Quilting with Angela Walters."  This book is so beautiful to look at and definitely inspiring.  I was really proud of my wood grain quilting.  It was fun to try and gave a lovely result.  The attempt at concentric circles didn't leave me too happy at first, but after the cases were washed it looks a whole lot better.
Less than half a layer cake was used to make these.  I bought it from Pink Castle Fabrics via an instagram sale. I have enough left to make some more Christmas gifts.

DSC_1082
 
Dresden blades
DSC_0899
DSC_1075
DSC_1086

First time trying this wood grain technique.  I started with some marking lines to get the hang of it.  I also went in an up and down motion instead of side by side.  It felt easier to me that way.
DSC_0939
DSC_1074
DSC_1077

A reindeer in the making.  (November 2013 Here is an update on how I did it.) 
When I made it last year I was looking for the perfect deer head silhouette.
This is the link to the one I used
http://www.itsoverflowing.com/2012/10/no-sew-pillow-antler/

What I did was trace the shape on my computer screen,  outlined it in a black sharpie, and then enlarged it by copying and printing it at a larger size. Hope that helps :)
DSC_1067

It was not intentional to have him look like he had shades on but I think it makes him cooler.
DSC_1079
DSC_1087
DSC_1090

Fabrics Used:
layer cake of Joy by Kate Spain for Moda
Aviary Woodgrain by Joel Dewberry
Kona Snow
Michael Miller Clown Stripe in Red
Backing - Christmas collection fron Joanne's

Sunday, October 28, 2012

Sew or Blog, not both

Where does the time go?!  I have been sewing, it just comes down to time in front of my machine or time in front of my computer.  I choose the sewing machine every time, I'm sure you understand.  So here is a quick rundown of what I've been up to.

First the silent auction quilt.  Well,  I decided to be selfish at the last minute and kept the triangle quilt for myself.  Instead I pulled out a WIP I had started 2 years before.  It was a tumbler quilt kit I had purchased on ebay.  I got about half way through and then it sat for a long time.  I finished the patchwork, quilted wavy lines throughout, and attached the binding, all in one night.  My favorite part of the quilt is my personalized label!  Cassie from GutenTags on etsy was awesome enough to ship a few labels to me super fast even though she was in the middle of unpacking after a move and her shop was closed.  I'm so thankful to her.  She really is the best and the labels are great!


Next finish was a baby quilt for my best friend.  Her baby boy should be arriving any day now.  She loves robots so this is what I made for her.


I also made her this stuffed robot to go along with the theme.

 
The pattern is from Danger Crafts on etsy.  It's not bad if you've made a doll before, but I wouldn't reccommend it for a beginner.
 
What happened to the triangle quilt you ask?  The back is pieced and it is basted.  I'm still trying to figure out how I want to quilt it.  Here is a shot from when I was playing with the layout for the back.

Oh yeah, this also happened 2 weeks ago.  I fell and fractured my foot.  Thankfully it wasn't my sewing foot, lol.  I'm doing much better now.

 
More projects in the works to share.  I just don't want to overload this post like I already have.  Hope everyone is doing well.  Thanks for reading.
 
Melissa